
The alternative photography process of cyanotype or blue prints is extremely versatile. Here is a brief overview of my experiments with applying the solution to ceramics.

My first experiments with using cyanotype on ceramics were using the left over and broken bisque fired items from a studio that I was working at. I wanted to take it a step further and start to figure the boundaries for the process. Things like how do I apply the solution? What ratio? What exposure time? How long a wash time? And, can I fire it?
The examples at the top were pinhole photographs that members of The Art Studio had taken using coffee can and boxes. I bought some handmade tiles from a stockist in Staffordshire. The man was really friendly, and they were cheap, but the overall quality of the little tiles wasn’t very good. The surface wasn’t level with the majority of the tiles having a slight concave where the porcelain had sagged in the middle. Some of the tiles were more textured as well where he may have used something to scrape across the top. At first, I had no idea that this would have any bearing on the quality of print achieved, but these imperfections definitely effected my final outcome.
The chemicals gripped in certain places, and I could not get my acetate negative in complete surface contact with the tile, which meant that some areas went soft focus. These tiles taught me a lot though. I realised that the surface quality of the tile is paramount for a clear image.


For my next project #wearexperimenting in 2018, I decided to try new bisque fired tiles from a different stockist. These were production standard and I bought 36 in a very fine buff clay which was very pale, and 36 in a slightly more robust earthenware. I wanted to see how the different production methods for the tiles would effect the final prints.
The first image above shows how I am creating the exposure. The cyanotype solution was applied 10 minutes before I intended to expose it, at a ratio of 1:1. This was to let the solution soak into the tile, but not to saturate it down to the deepest level. It was exposed under a 20 watt UV lamp for an hour. I then washed the tile for approximately 20 minutes. The second image shows the tile not long after the wash, and it wasn’t fully dry. I left it overnight, and the cyanotype solution had leached through to the surface by the next morning; and it was still continuing to darken. I hadn’t washed it enough by a long shot, and I had over exposed it. I washed it again, and then coated it with varnish as seen in the final image. The tile wasn’t a success but again I felt I had learned a lot from the mistakes.


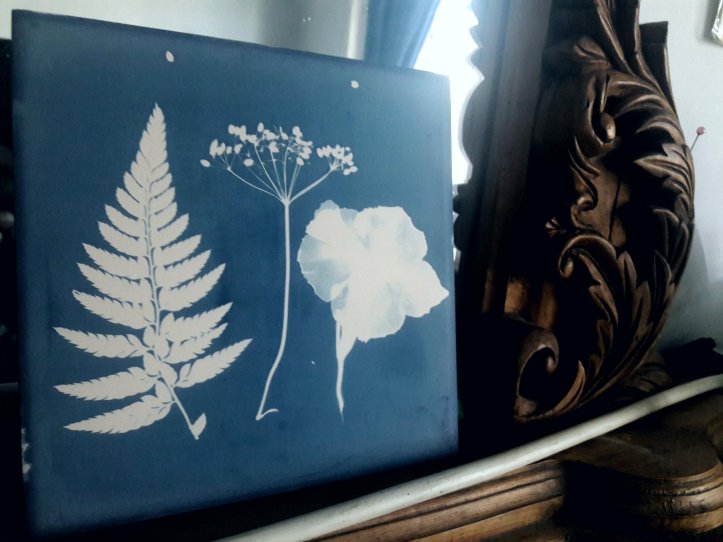
I kept refining the process during the rest of the project. Using the tiles to print pinhole photographs on that were created during public workshops, instax photos that I took throughout the project to document it, and plants collected from the workshops. This time the exposures were 30 minutes, they were washed thoroughly several times, and sealed with varnish. They were displayed in a window in full sun for a month and suffered no fading.


I have continued to revisit the process in more recent projects, to varying degrees of success. Sometimes, it is my own fault for being impatient or hurrying the process when I know fine well that patience goes a long way when you are working with the blues.
For my project Me and Mary Eleanor I used the tiles in conjunction with other materials like gold leaf, polaroid photographs, antique lithographs, and had fun smashing one to bring it back together. There is still a lot to learn, and I haven’t been able to further explore the firing process, (as it’s tricky and I don’t have a kiln), but that seems the next natural step if I can. I know that there has been some success because I have seen some wonderful posts on instagram, so it is possible.
I will create a YouTube video showing the process soon. But, until then, I hope that this was useful for you. Have a look at my other tips on there:
Good luck! And, have fun!
You are welcome. Cone 3 is best for cyanotype 🙂
Thank you too. Solidarity. We can do this. Whinging is allowed 🙂
Hi Jo! Thanks for this post, it was a helpful starting point for doing cyanotype on ceramic. I just did some ornaments with 1:1 chem ratio and a UV light with 20 min exposure. They came out amazing, and I rinsed them for a good hour under running water (because the ones I did last year continued to turn more blue over time and I lost a lot of the stark white print, so i figured I needed to rinse longer.)
But after that much rinsing, I had one test piece under a gentle grow light this morning and it still started to turn blue in the white areas. Do you have any tips? I’m not sure what else to do other than just rinse or soak these ornaments for a full day or something. I put the thinnest coat of chemical on that I could also. Thanks for any help!
If you’re not firing them you need to varnish them to stop the reaction. Soaking them doesn’t work as the gas in the tiles will want to escape. I have a more recent lesson on my Patreon with other observations. Good luck!